How to Maintain Tractor Battery ?
A dead battery is one of the most common reasons a tractor fails to start, especially during the busy farming season. Proper battery maintenance ensures your tractor starts reliably every time. This complete guide explains how to check, maintain, and extend the life of your tractor battery.
Understanding Your Tractor Battery
Most Indian tractors use a 12 Volt lead-acid battery. The battery capacity is measured in Ampere Hours (AH). Common sizes are 88 AH and 100 AH. The battery powers the starter motor, lights, instruments, and ignition system.
Signs of a Failing Tractor Battery
Watch out for these warning signs:
– Tractor cranks slowly when starting
– Tractor does not start at all
– Battery warning light on dashboard
– Headlights are dim
– Battery case is swollen or cracked
– White or blue corrosion on terminals
– Battery is more than 3 years old
How to Check Battery Condition
Check 1 — Visual Inspection
Look at the battery for any cracks, leaks, or swelling. Check the terminals for corrosion (white or blue powder). A damaged battery must be replaced immediately.
Check 2 — Check Electrolyte Level
For non-sealed batteries, remove the caps on top of the battery. The electrolyte (liquid) should be above the plates inside. If it is low, add **distilled water only** — never tap water or normal water.
Check 3 — Check Voltage with Multimeter
Set your multimeter to DC Voltage (20V range). Connect red probe to positive terminal (+) and black probe to negative terminal (-).
| Voltage Reading | Battery Condition |
|—————-|——————|
| 12.6V or above | Fully charged — Good |
| 12.4V | 75% charged — Acceptable |
| 12.2V | 50% charged — Needs charging |
| 12.0V or below | Discharged — Charge immediately |
| Below 11.8V | Bad battery — Replace |
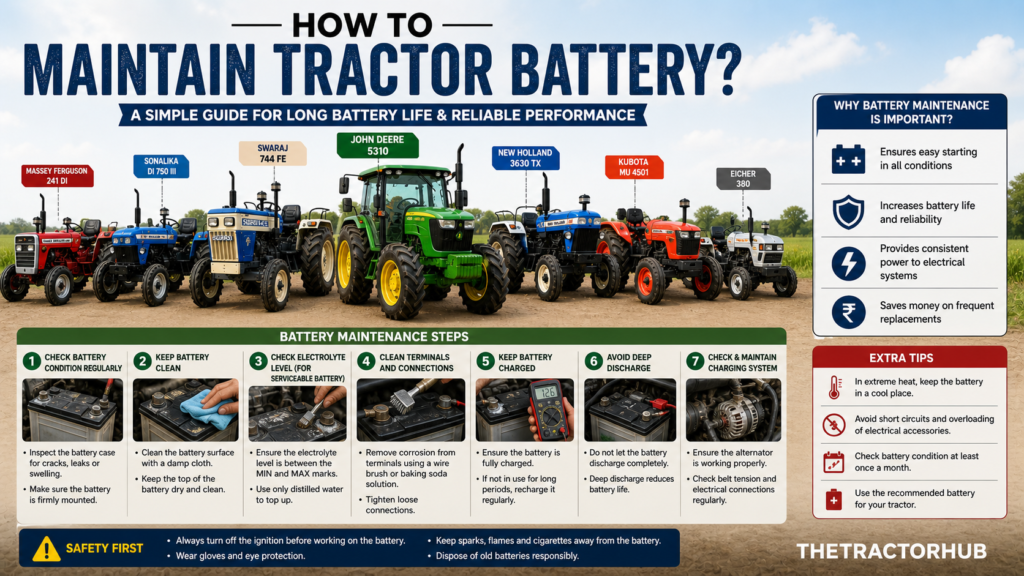
Battery Maintenance Steps
Step 1 — Keep Terminals Clean
Mix 1 teaspoon of baking soda in a cup of water. Apply this solution to corroded terminals using an old toothbrush. It will bubble and clean the corrosion. Rinse with clean water and dry completely.
Step 2 — Apply Terminal Grease
After cleaning, apply petroleum jelly or terminal grease to both terminals. This prevents future corrosion and ensures good electrical connection.
Step 3 — Check Battery Mounting
Make sure the battery is securely mounted. Vibration from tractor operation can damage the internal plates. Tighten the battery clamp if loose.
Step 4 — Check Charging System
When the tractor is running, measure voltage across battery terminals. It should read 13.8V to 14.5V. If it reads less, your alternator or charging system may have a problem.
Step 5 — Regular Charging
If the tractor is not used for more than 2 weeks, use a battery charger to keep it charged. A discharged battery left for a long time gets permanently damaged.
Battery Care Tips for Indian Farmers
– Always turn off all lights and switches before stopping the tractor
– In summer, check electrolyte level every 2 weeks
– In winter, a fully charged battery is less likely to freeze
– Never jump start using a truck battery — voltage difference can damage electronics
– Keep the battery top clean and dry — a dirty battery top causes self-discharge
How Long Should a Tractor Battery Last?
A good quality tractor battery lasts **3 to 5 years** with proper maintenance. Poor maintenance can reduce this to just 1 to 2 years.
Pro tips :- Always use branded battery like . Exide, Amaron, Luminous, and Eastman are considered the best branded batteries in India, offering high reliability, durability, and strong after-sales support for inverters and automobiles.
Conclusion
Your tractor battery is a small but critical component. Spending just 15 minutes every month on battery maintenance can prevent unexpected breakdowns during critical farming operations. Check the electrolyte level, clean the terminals, and ensure the charging system is working — these three simple steps will keep your tractor starting reliably for years.